AWS ECS/Fargate Bastion Host
AWS Fargate is a great tool for quickly putting together scalable infrastructure. The ability to spin containers up and down based on usage, as well as failure-recovery has created a bunch of new opportunities for HA services, but without the administrative headache that typically comes along with them.
In this post, I’ll walk through a set of Terraform templates that will deploy HA load-balanced bastion servers in to AWS Fargate. These servers can be used for basic SSH access, or more conveniently, SSH tunneling to reach otherwise inaccessible pieces of infrastructure hidden in private subnets.
TL;DR
The complete repository can be found here: https://github.com/bruceharrison1984/aws-fargate-bastion-cluster
Architecture
The general architecture is represented in the following diagram:
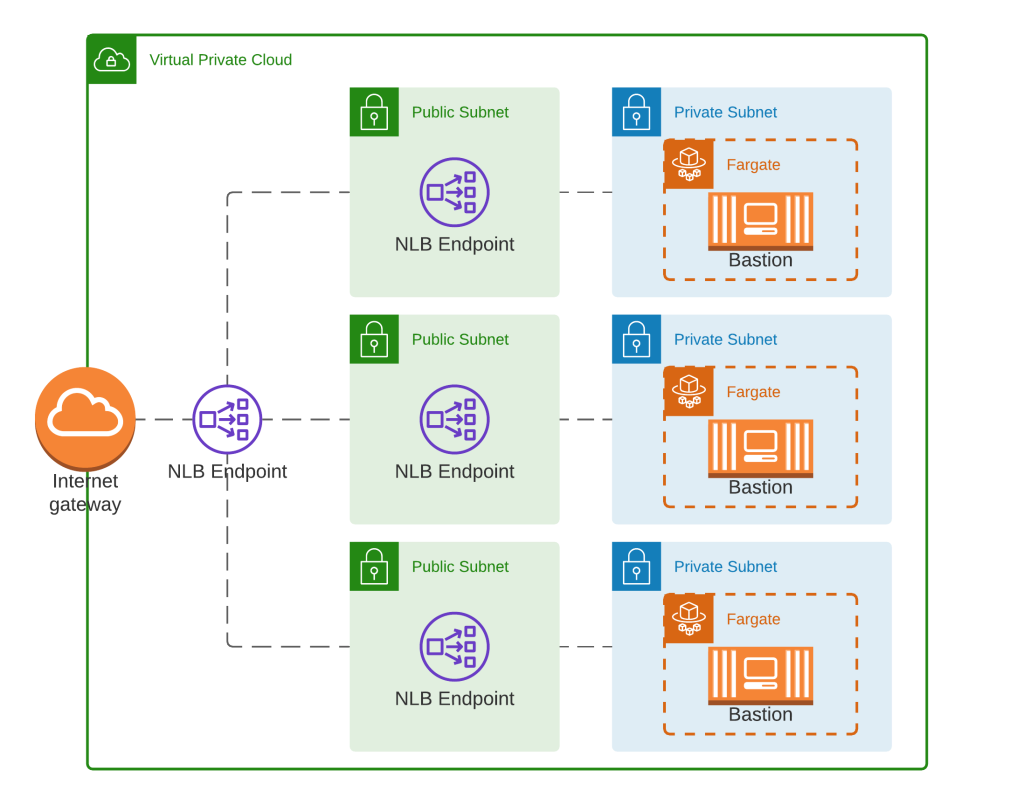
- Matching private/public subnets in each AZ
- Three ECS Fargate containers running the linuxserver/openssh-server container
- Containers are deployed in to each subnet by ECS
- A single NLB, with endpoints in each of the public subnets
- The bastion ECS tasks can communicate with any of the NLB endpoints (not depicted in the diagram)
So we have a highly resilient architecture in terms of network failure, and it is presented to the internet as a single endpoint. Nice!
Why Not Application Load Balancer?
Initially I had wanted to use an ALB, but there is a big drawback to ALBs. They can only forward communications to applications that serve HTTP/HTTPs content. They aren’t able to pass generic TCP communications(SSH) to backend services, so thus it doesn’t work in this scenario. So the NLB allows us to do what we need, but it has a major drawback I will highlight shortly.
The upside to the NLB, is that it is a layer 4 service, so it is extremely fast and doesn’t add much overhead to the TCP communication.
Authentication
We will handle authentication in to our SSH server with certificates. Our container conveniently disables username/password login, so we can feel fairly safe from brute force attacks. We will leverage a couple Terraform modules to get our authentication setup:
- Use the Terraform TLS provider to generate a 2048 bit certificate
- Place the public/private keys in to AWS Secrets Manager
- Use the Terraform random provider to generate a random username
- Place this in to AWS Secrets Manager
So now we have everything we need to get secure login, but now we need our container to know about it. The next step is to allow the ECS Task to access those particular Secrets and read them, and inject the values as environment variables in to our container. The linuxserver/openssh-server does most of the heavy lifting here, so kudos to the developers of it.
resource "aws_ecs_task_definition" "bastion" {
  family                   = "${var.base_name}-bastion-task"
  network_mode             = "awsvpc"
  requires_compatibilities = ["FARGATE"]
  cpu                      = 256
  memory                   = 512
  execution_role_arn       = aws_iam_role.ecs_task_execution_role.arn

  container_definitions = jsonencode([{
    name      = "bastion"
    image     = "linuxserver/openssh-server"
    essential = true
    portMappings = [{
      protocol      = "tcp"
      containerPort = 2222
      hostPort      = 2222
    }]
    environment = [
      {
        name  = "DOCKER_MODS"
        value = "linuxserver/mods:openssh-server-ssh-tunnel" ## enable ssh-tunneling to backend resources
      }
    ]
    secrets = [
      {
        name      = "PUBLIC_KEY" ## inject public key in to container
        valueFrom = var.public_key_secret_arn
      },
      {
        name      = "USER_NAME" ## inject bastion username in to container
        valueFrom = var.bastion_username
      },
    ]
    logConfiguration = {
      logDriver = "awslogs"
      options = {
        awslogs-group         = aws_cloudwatch_log_group.bastion.name
        awslogs-stream-prefix = "ecs"
        awslogs-region        = "us-east-2"
      }
    }
  }])

  tags = merge(var.default_tags, {
    Name = "${var.base_name}-bastion-task"
  })
}
The parts to focus on on the “secrets” and “environment” sections of the task configuration. We pipe in the ARNs of the username and public keys so they are available within the container. The extra little piece of magic is the DOCKER_MODS environment variable that the linuxserver team makes use of. It allows us to enable SSH Tunneling without re-rolling the image (good job guys!).
When the container starts up, it will place the public key in the authorized_keys, and create a user based on the username Terraform created.

Now we can login to the server by doing the following:
- Retrieve the username from AWS Secrets Manager
- Retrieve the private key from AWS Secrets Manager
- The contents of the secret must be written to a file where your SSH client can access it (~/.ssh/ etc)
- Open an SSH connection to the bastion_ssh_endpoint, using the certificate as the identity, and entering the username when you are prompted.
Upsides
We have a bastion host that we can very reliably presume will always be available, and it’s (kinda) cost effective. By using a secured container, we can also be sure that SSH users can’t escape their sandbox and cause issues on the SSH server itself.
Caveats (uh oh...)
While deploying your bastion hosts in an ephemeral and scalable fashion, it does have some significant drawbacks.
- Network Load Balancers cannot be protected with Security Groups
- This means your bastion hosts are discoverable by anyone on the internet.
- They are still protected by certificate authentication
- The Network Load Balancer must be whitelisted to the ECS container security group for the sake of health-checks as well as SSH traffic (which in turn allows all traffic). So there isn’t a way around this.
- This means your bastion hosts are discoverable by anyone on the internet.
- You cannot guarantee which bastion host you will hit when logging in, so SSH Fingerprint errors are likely to occur when logging in.
- This could be extremely annoying if you intend to interact with these servers in an automated fashion
- Opens the door to potential MITM attacks if you just ignore the errors
Alternatives
Something as simple as a standard EC2 secured by Security groups has worked great in the past, and continues to do so. You could also host a single Fargate container behind a Security group as well. These are both very simple scenarios, and a large organization will likely have much greater needs than any of these configurations can realistically provide. But for small projects and startups, this should be more than enough to fill the need for the short-term.
Final Thoughts
I had a fun time thinking through this process, and coming up with an architecture that would let me deploy bastion servers in this way. Sadly, the serious caveats will likely outweigh any benefits, so I would be apprehensive about deploying this in a production environment. The inability to shield the bastion containers from direct internet access leaves a bad taste in my mouth, and I would sooner deploy a single EC2 instance and deal with occasional reboots.
The complete repository can be found here: https://github.com/bruceharrison1984/aws-fargate-bastion-cluster
Even more final thoughts
If you are determined to go down this road, I would recommend just using a single FarGate container exposed to the internet, secured with an SSH key and IP whitelisting.
The accompanying repository can be setup to do this by simply changing module.bastion.container_count = 1 instead of 3. This avoids the SSL thumbprint issue, so you can securely connect to the container.
However, at that point the NLB is basically pointless and could be removed. With the NLB gone, you would be free to secure the server with IP whitelisting via Security Groups, which is a much better solution.